Page 17 of 63
Re: progress on the banshee...
Posted: Tue Apr 11, 2017 2:56 am
by ericjon262
got one of the 13" brake setups installed a week or so ago, but found out the used 17" rims I had bought won't fit over them at all.... so I put them on craigslist and started looking around, and after seeing nothing that made me happy, decided to throw down and get a set of new rims, fronts are 18x8's, rears are 18x9.5. the MS3x is pretty much done being wired in, and the car is no longer dead electrically, unfortunately, I did something painfully retarded when I installed the knock module on my MS3x, there is a ribbon cable from the MS3, to an expansion card (hence the x). well, while installing the knock module, I removed the cable, because I was worried about accidentally burning it with the soldering iron, when I put it back on, I put it on wrong, and fried the MS3, and the expansion board... its a mistake I won't make again, cost me way too much money. but, among other things, a new MS3x is on the way.
Re: progress on the banshee...
Posted: Tue Apr 11, 2017 7:26 pm
by The Dark Side of Will
Because of the very shallow hat section, Corvette wheels are pretty much the only ones that Corvette brakes fit under.
You could also switch to a two piece rotor with a taller hat that may allow you to run your old wheels.
Having the option is good for tire selection.
Nice job on the MS3x. I guess when something's idiot proof someone develops a better idiot.


I was testing an integrated amp once years ago; it failed and sent a huge slug of DC current to the speakers before completely burning itself out. It melted the voice coil in a basically new Kicker sub... resulting in an $80 paper weight.
Re: progress on the banshee...
Posted: Tue Apr 11, 2017 10:31 pm
by ericjon262
The Dark Side of Will wrote:Because of the very shallow hat section, Corvette wheels are pretty much the only ones that Corvette brakes fit under.
You could also switch to a two piece rotor with a taller hat that may allow you to run your old wheels.
Having the option is good for tire selection.
Nice job on the MS3x. I guess when something's idiot proof someone develops a better idiot.
I was testing an integrated amp once years ago; it failed and sent a huge slug of DC current to the speakers before completely burning itself out. It melted the voice coil in a basically new Kicker sub... resulting in an $80 paper weight.
yeah, the MS3x was painful, at this point I could have bought an MS3 pro and installed it in the engine compartment, instead of the MS3x which needs to stay dry. I really wish the install guide for the knock module had shown the cable orientation, it's shown in the same manual, but in a different section, I thought I had it oriented correctly, but after spending a while troubleshooting why my laptop wouldn't connect, I found a component charred on the board and figured it out. the bright side, is that I know what was fucked up, and am not still trying to figure it out. everything else was correct, I was running out of things to place blame on...
I already ordered new wheels, they should be hear tomorrow, the wheels that didn't fit where just going to be temps anyways, until I found something I liked better. the inference was inside diameter, the 18's should net me more than enough clearance. at some point, I am going to switch to 2 piece rotors to reduce rotating mass, and unsprung weight, might even do four piston calipers, as the upgrade should be fairly easy.
Re: progress on the banshee...
Posted: Wed Apr 12, 2017 11:24 am
by ericjon262
Question, would moving the strut top inboard on an 84-87 be detrimental for handling? I need would like a bit more clearance between the struts and the wheels, without adding a spacer in. long-ish term I plan to swap in an 88 cradle.
Re: progress on the banshee...
Posted: Wed Apr 12, 2017 7:27 pm
by The Dark Side of Will
Moving the strut top shouldn't have any serious problems, but will put the strut top bushing at a constant angle. Moving the top of the strut will improve camber gain, but won't gain much wheel clearance. For the sake of camber gain, the top of the strut should be as far inboard as you can place it.
I'm already planning to extend the strut flanges that bolt to the hub carrier in order to allow as much as 1" more backspacing clearance. That will be necessary to fit the 18x10.5 C5 ZO6 wheel I have. This will reduce motion ratio slightly, and again put the top bushing at a static angle.
Doing both would be best.
What wheels are you looking at? The C5 Corvette wheels are 18x9.5-58, I think. With a 1" spacer that's a 34mm offset.
Re: progress on the banshee...
Posted: Thu Apr 13, 2017 1:22 pm
by ericjon262
The Dark Side of Will wrote:Moving the strut top shouldn't have any serious problems, but will put the strut top bushing at a constant angle. Moving the top of the strut will improve camber gain, but won't gain much wheel clearance. For the sake of camber gain, the top of the strut should be as far inboard as you can place it.
I'm already planning to extend the strut flanges that bolt to the hub carrier in order to allow as much as 1" more backspacing clearance. That will be necessary to fit the 18x10.5 C5 ZO6 wheel I have. This will reduce motion ratio slightly, and again put the top bushing at a static angle.
Doing both would be best.
What wheels are you looking at? The C5 Corvette wheels are 18x9.5-58, I think. With a 1" spacer that's a 34mm offset.
not looking anymore, got them in yesterday, enkei Kojins like what Fiero Guru runs, I'll have to do something to them so I don't look like a copycat... the rears are 18x9.5 with a 45mm offset, the fronts are 18x8 35mm offset. I was anticipating possibly needing a spacer to run them until I swap in the 88 cradle I have. I'm gonna try and pick up a bit more tire clearance by going to a 350# 9" spring to gain a bit more clearance but I still think I'll need something between the wheel and the hub. I need to find some front springs as well.maybe it's time for me to start looking into a coilover setup for the front.
Re: progress on the banshee...
Posted: Thu Apr 13, 2017 2:43 pm
by Shaun41178(2)
I think west coast Fiero sells a front coilover setup. Might be worth checking out
Re: progress on the banshee...
Posted: Thu Apr 13, 2017 4:39 pm
by ericjon262
Shaun41178(2) wrote:I think west coast Fiero sells a front coilover setup. Might be worth checking out
looked on their site, it appeared to be a rear coilover kit, sold with front springs.
Re: progress on the banshee...
Posted: Wed Apr 26, 2017 5:36 pm
by ericjon262
pulled the cradle and engine to swap in an 88 cradle. also going to re-work the engine mounts while it's out, should be mounted way better when I'm done. hopefully I'll get the new mounts done pretty quick, and can get this thing going back together. I'm also going to make a new thermostat housing that goes down at a better angle than the stock 3500 unit, to help make clearances better , as well as hose routing.
Re: progress on the banshee...
Posted: Sat Apr 29, 2017 5:32 pm
by ericjon262
Scatter shield is done, along with the integral portion of the front transmission mount. Rear transmission mount is almost done, I want to add one more gusset, then all it needs is paint and the bushing pressed in. I started the front engine mount, and have made some progress, but it still needs substantial reenforcement. I may also have to notch the mount for axle clearance, but I am not sure yet. This new setup should be a huge improvement over what was there, from multiple standpoints, but I did discover the cause of several nvh problems. Both the front and rear transmission mount bolts had backed out by a fairly good margin. Not sure why, or how, but they did, but I'm happy that it will be another for fixed rattle/clunk since starting the Megasquirt install.
Re: progress on the banshee...
Posted: Sat Apr 29, 2017 6:34 pm
by The Dark Side of Will
The manual calls for pretty aggressive torque specs on the transmission mount bolts, and GM used 10.9's there instead of 8.8's. Food for thought.
Re: progress on the banshee...
Posted: Sun Apr 30, 2017 5:15 pm
by ericjon262
well, it's not going to be a problem again, the new mounts are totally different, and even if it did loosen, it wouldn't be a problem until the bolt physically fell out...
the new rear mount (trans side) is done, and the engine mount is pretty much done. I need to notch it for axle clearance still, as mentioned in my last post. all that's left mount wise is to finish the front trans mount/scattershield, and the chassis side mounts, so hopefully I can have that stuff finished bright and early, so I can roll into re-locating the strut tops inboard for the 88 cradle, and fixing the cage nut the started spinning when I puled the engine out last.
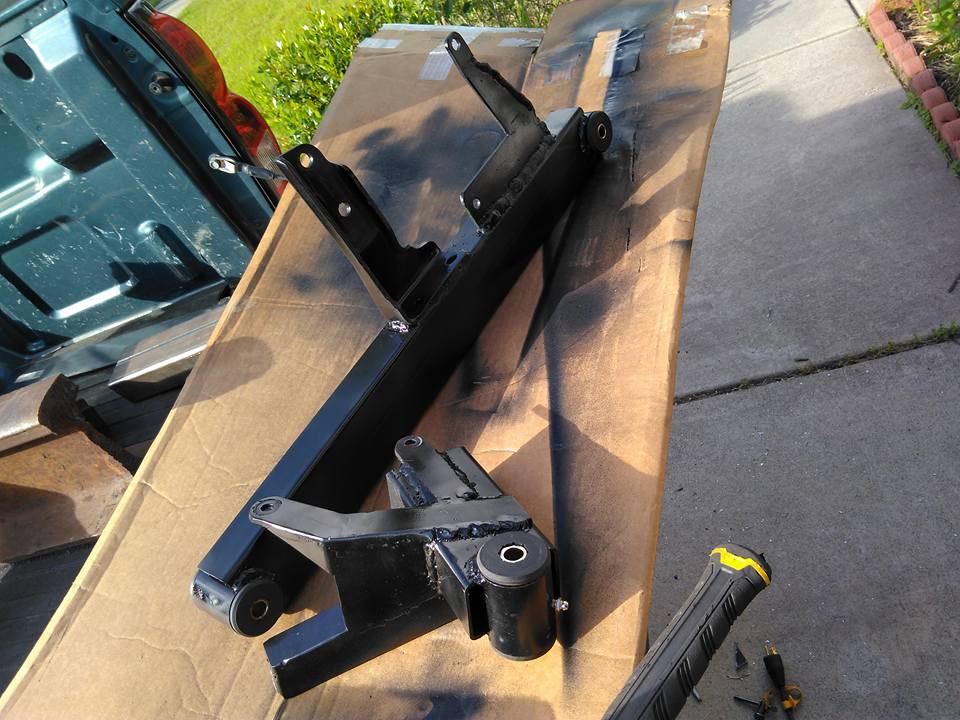
- mounts.jpg (103.07 KiB) Viewed 1176 times
I'm contemplating adding a dogbone up top as well, but I'm not sure it will be necessary.
Re: progress on the banshee...
Posted: Mon May 01, 2017 5:07 pm
by ericjon262
I feel like the only thing I managed to get done today, was to burn up my angle grinder... I sourced some hardware to replace the cage nut for the cradle, but haven't fabbed the replacement yet. 3 of the 4 mounting points are done, just need to knock out the front transmission mount, it's tucked up in a way that's hard to work around. I also managed to take all of the slack out of the shifter mechanism I built by adding a nylon bushing in on the select lever, and tightened the shift lever by throwing a good, firm, tack weld on the pin that attaches the lever to the shift shaft. hopefully I never have to take it apart... if I do, I'll have a precisely machined sleeve made for the lever to ensure there is no play. like the original setup I made had. should make for a whole new experience to drive, I'm really excited to see how it feels in the car.
Re: progress on the banshee...
Posted: Tue May 02, 2017 8:32 am
by Shaun41178(2)
I remember my shifter had some side to side play eleven with new cables and bushings from rodent, I found a washer to slide in someplace to fix it. Feels solid now not sure if that's what you were experiencing too.
Got any more pics of the ms? My buddies are trying to talk me into the ms3x for around $650 ish. I also found a ms3 on eBay with the guts in a 7730 computer using the factory 7730 plugs making it a plug and play but I never made the conversion from the factory computer so no point for me to get that. What else would I need? A small harness extension? Usb cables to the laptop?
Re: progress on the banshee...
Posted: Tue May 02, 2017 6:50 pm
by ericjon262
the play I fixed was on the transmission end, not the car end. if there is further play, I'll pull the shifter out and try and tighten it up some. I'm almost worried the select motion on the transmission might be too tight, but I feel like it should loosen up a little over time.
I do have more pictures but most of them are too large to attach, and IMG tags aren't working on here. is there something in particular you want to see?
here's what the mostly finished product, I need to put some loom on the wiring, and tidy some things up, but otherwise, that's it.
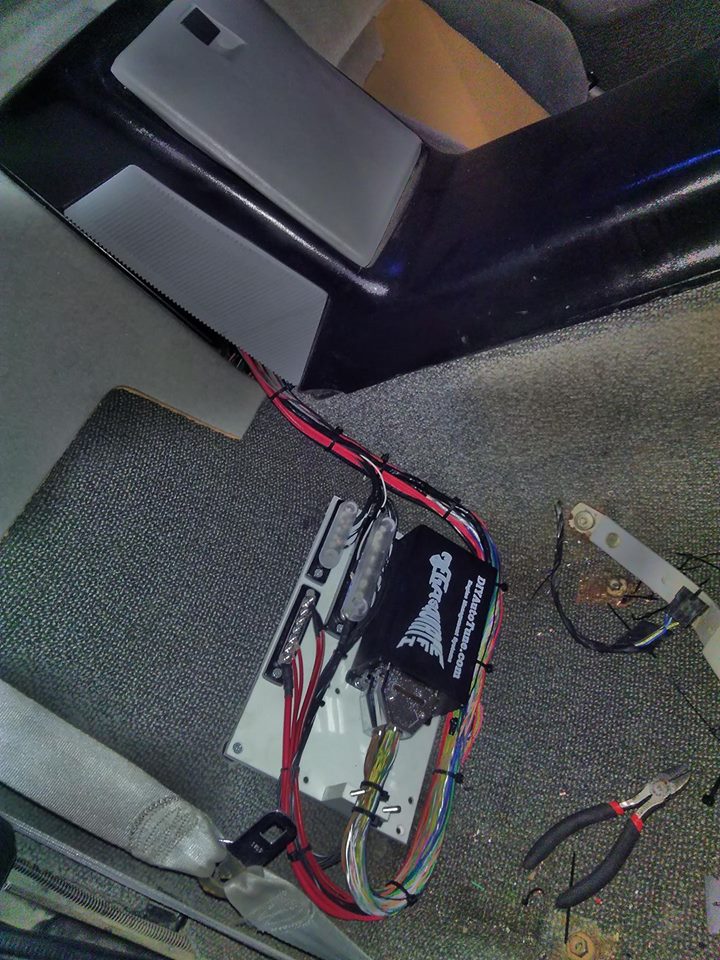
- mega1.jpg (153.03 KiB) Viewed 1160 times
I like the idea of the MS3 in a 7730 case plug and play style, but I don't think the expansion card will fit to give the full benefits. 650 isn't a bad price if ti includes the knock module already installed. the MS3x is about 780 with the module installed from DIY auto tune. DIY auto tune does have great customer service if you go the new route. I will say though, I think if I did it all over again, I would go straight to the MS3 pro, it does everything the MS3x does, but is installed in a weatherproof case, and can be installed anywhere. at DIYautotune's SEMA booth, the had one in a fish tank(complete with fish) with a set of injectors spraying in a plexi box, next to a set of spark plugs firing.
in other news, the strut tops have been relocated for the 88 cradle, the front trans mount is close to being done, the decklid hinge boxes have been cut out, and the engine mount has been notched for axle clearance. hopefully tomorrow I can make some more serious progress, but I keep getting plagued by bad luck, I bent or broke 3 drill bits today alone, and managed to twist a hex key like a corkscrew. yesterday my angle grinder bit the dust, so I can't help but wonder whats coming next...
Re: progress on the banshee...
Posted: Wed May 03, 2017 1:43 pm
by Shaun41178(2)
Yea i went to diyautoyune to look at things. Are any additional cables needed or does it come with everything including the usb to computer?
Here is the drop in someone did.
http://m.ebay.com/itm/192148186201?_mwBanner=1
Re: progress on the banshee...
Posted: Wed May 03, 2017 6:24 pm
by ericjon262
Shaun41178(2) wrote:Yea i went to diyautoyune to look at things. Are any additional cables needed or does it come with everything including the usb to computer?
Here is the drop in someone did.
http://m.ebay.com/itm/192148186201?_mwBanner=1
That drop in unit is cool, if you already have a 7730, but it's also only an MS3, it doesn't have, nor does it appear to support the expansion card to bring it up to MS3x. you will need a USB cable, the MS3 has a USB type B connector (square-ish one), so youll need a USB a-b cable to interface your laptop, or a serial cable, and a usb to serial adapter like you probably already have for your current tuning setup. the add also doesn't mention knock sensing capability(not supported on MS3 without an add on card or external module), which is a big deal for a turbo car imo.
cables are another story, in my instance, I wanted to re-wire the whole engine anyways, so I sprung for the 10' harness. if you feel so inclined as to splice your entire engine harness, then you could use the 2' pigtail. me personally, I don't like that many unnecessary splices, to many places for a connection to come and have an intermittent fault. if you go the slice route,another option would be to cut the connectors out of your current ECM, and solder the MS3 harness to that. no matter which way you go, it's a ton of work.
I was hoping to have the engine back in the car today, but had several seemingly insignificant set-backs add up to a significant set-back. hopefully tomorrow is the day.
Re: progress on the banshee...
Posted: Wed May 03, 2017 8:20 pm
by The Dark Side of Will
ericjon262 wrote:the decklid hinge boxes have been cut out
What drove you to do that?
Having lived with a modified hinge box for a while, I have to say that GM's way of setting up the boxes and hinges is as good as it gets.
Re: progress on the banshee...
Posted: Thu May 04, 2017 3:14 am
by ericjon262
The Dark Side of Will wrote:ericjon262 wrote:the decklid hinge boxes have been cut out
What drove you to do that?
Having lived with a modified hinge box for a while, I have to say that GM's way of setting up the boxes and hinges is as good as it gets.
My intake manifold occupy's the same place as the passenger side hinge, my decklid has been a lift off for years now, so I figured I would at least regain the space they took up. it should make spark plug swaps way easier. if I ever get to a point that I need or want the hinges back, I'll set them up like guru did his.
http://www.fiero.com/forum/Forum1/HTML/085829.html
Re: progress on the banshee...
Posted: Thu May 04, 2017 7:57 pm
by ericjon262
it is with great pleasure that I announce, that after over a week of 16+ hour days working to get the new engine, transmission mounts, and 88 cradle swap done the car has an engine again. the suspension is installed, but I haven't installed the brakes yet. so it's still off the ground. somehow the driver's side C/V axle is binding pretty bad, but the engine and transmission are in the same place as they were on the 85 cradle, and it was fine on there... I'm wondering if it was damaged somehow and when I was making the new mounts it was tweaked just enough to fail. IDK, it's odd.
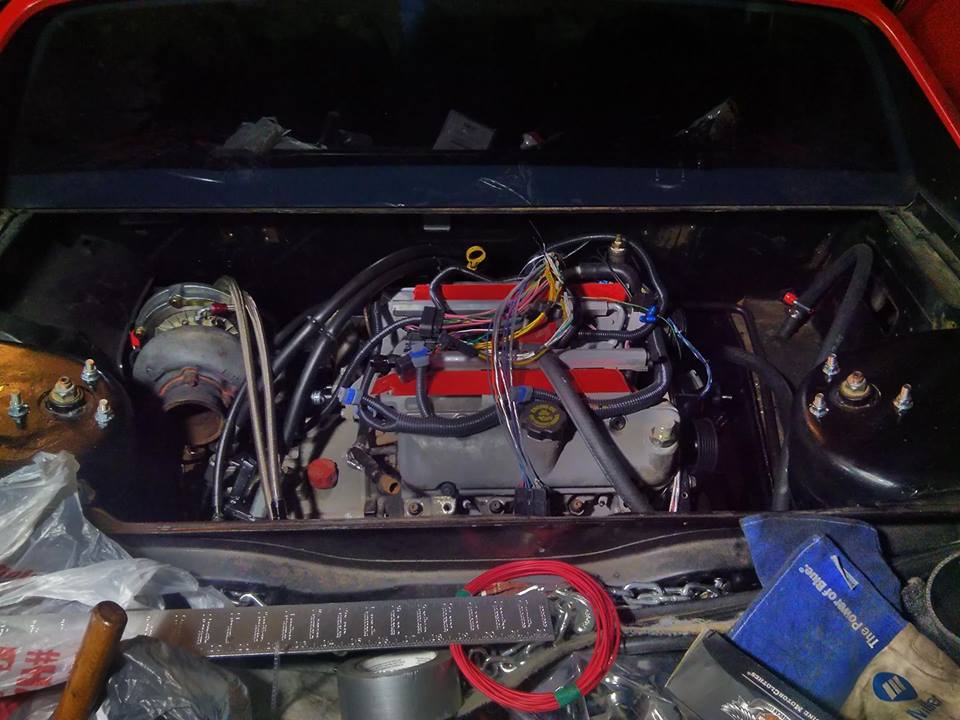
- engine.jpg (82.7 KiB) Viewed 1125 times
that's it for progress for a couple of days though, gonna go fishing in FL.