Or www.ti64.compmbrunelle wrote: ↑Sun Mar 27, 2022 11:31 am
If you want out-of-the-ordinary finishing, bling, or strength, that's when you go to ARP.
High Feature V6 Swap
Moderators: The Dark Side of Will, Series8217
-
The Dark Side of Will
- Peer Mediator
- Posts: 15626
- Joined: Wed Nov 24, 2004 11:13 pm
- Location: In the darkness, where fear and knowing are one
- Contact:
Re: High Feature V6 Swap
-
ericjon262
- Posts: 2824
- Joined: Mon May 24, 2010 5:34 pm
- Location: Aiken, SC
Re: High Feature V6 Swap
dude, we're building fiero's here...The Dark Side of Will wrote: ↑Sun Mar 27, 2022 12:07 pmOr www.ti64.compmbrunelle wrote: ↑Sun Mar 27, 2022 11:31 am
If you want out-of-the-ordinary finishing, bling, or strength, that's when you go to ARP.
"I am not what you so glibly call to be a civilized man. I have broken with society for reasons which I alone am able to appreciate. I am therefore not subject to it's stupid laws, and I ask you to never allude to them in my presence again."
-
pmbrunelle
- Posts: 610
- Joined: Thu May 20, 2010 10:07 pm
- Location: Grand-Mère, QC
Re: High Feature V6 Swap
The less money you spend on the car, the more you can afford to go full retard with on parts for it.ericjon262 wrote: ↑Sun Mar 27, 2022 8:57 pmdude, we're building fiero's here...The Dark Side of Will wrote: ↑Sun Mar 27, 2022 12:07 pmOr www.ti64.compmbrunelle wrote: ↑Sun Mar 27, 2022 11:31 am
If you want out-of-the-ordinary finishing, bling, or strength, that's when you go to ARP.
This is an ARP bolt holding a tie-rod end heat shield to my cradle
- IMG_6126.JPG (164.35 KiB) Viewed 5267 times
-
ericjon262
- Posts: 2824
- Joined: Mon May 24, 2010 5:34 pm
- Location: Aiken, SC
Re: High Feature V6 Swap
That bolt cost more than the heat shield! lol!pmbrunelle wrote: ↑Sun Mar 27, 2022 9:29 pm The less money you spend on the car, the more you can afford to go full retard with on parts for it.
This is an ARP bolt holding a tie-rod end heat shield to my cradle
IMG_6126.JPG
"I am not what you so glibly call to be a civilized man. I have broken with society for reasons which I alone am able to appreciate. I am therefore not subject to it's stupid laws, and I ask you to never allude to them in my presence again."

Re: High Feature V6 Swap
Back onto the fiero and about to replace the fuel cam, springs, and lifters on the LF3/4 after relearning and repairing my Mazda automatic climate control system...
Back to practicing tig too...
While working on the ac system in the mazda, I was thinking about the fiero AC system in the essence of getting things up to speed asap, including the AC, and reducing immediate complexity... I'm considering going with a new standard "Fiero" compatible compressor and not the PWM variable compressor I have on the LF3/4. The variable compressor is controlled by the BCM which I'm eliminating and 'eventually' replacing with an Arduino based PWM component, but has anyone here ever replaced the V-band pulley on the fiero V6 compresssor with ribbed pulley and used it on another swap just to keep swap complexity, i.e. hoses, down?
I look forward to building an arduino based HVAC climate control system using PWM... because I'm a geek like that.... but let's get the damn thing, including AC, running first...
Thoughts...
-
The Dark Side of Will
- Peer Mediator
- Posts: 15626
- Joined: Wed Nov 24, 2004 11:13 pm
- Location: In the darkness, where fear and knowing are one
- Contact:
Re: High Feature V6 Swap
The 2006 Corvette ECM I'm using reads an A/C pressure transducer and controls the compressor clutch from that. However, it gets the A/C request over the bus instead of via a discrete wire. The use of the pressure transducer eliminates the need for pressure cut-out switches in the back of the Fiero compressor. The pressure transducer can be mounted anywhere on the high pressure line.
I use a 1995 El Dorado A/C compressor. It has a 6 rib pulley and no pressure switches, but it otherwise very very similar to the Fiero unit, to include having the same mounting points.
The Fiero system can also run entirely without ECM interaction... but the compressor will stay on at WOT or high RPM if the pressure cycling switch thinks it should be on.
Re: High Feature V6 Swap
Finally finished a "working" prototype of the griffin radiator mounting setup... I know this is "waaaay" overbuilt but my tig skills still suck balls so I assembled the aluminum frame using flush hammered rivets from aluminum rod. When my tig skills 'ever' improve I'll go back and weld up the seams.
I started with a length of 4" aluminum channel, a hole saw for the radiator cap, cut "V's" in the skirts, annealed the aluminum and bent it into place.
Couldn't find any radiator cushions to mount the Griffin radiator so I purchased some hi-temp silicone extrusions and threaded collars to mount to the radiator saddle using beveled stainless screws to hold the radiator in place without touching the aluminum channel.

Used the O'le CAD skillset to festoon some brackets to the sides and flush riveted them on using 3/8" aluminum rods and a hammer/anvil.
Initial fit-up


Modifications to the bottom saddle were to bend the rear of the saddle to hold the larger Griffin (even moreso than Steven's as this is the 600hp version and 1" additional depth), trim the OEM lengthwise cushion ends. Reposition the bottom cushions to the outside holes exposed by cutting the lengthwise cushion and trim the ends of the end cushions to fit into the bottom of the Griffin. (Note the smaller well-nut for the new condenser as the OEM well nut impacts this 2.6" thick Griffin and gouged and pierced one of the fins, fuckity fuck fuck fuck...)

Cut, annealed, and pressed some additional brackets to hold the C7 ZR1 fan shroud in place with rubber bushings and press fit stainless studs.

I chose to reverse the flow of the coolant tubes, instead of crossing them over as the High Feature GM V6 has an opposite flow to that of the OEM radiator. Found a Gates 1.5" flex hose with 90 deg elbow and a 1.25" reducer for the coolant tube from the engine. For the exit side I pieced together two oddly shaped hoses I found searching through the excellent Dayco website, using 2 ICT Billet couplers, and a 1.75" to 1.25" reducer from HPS.


Not shown, but coming, is an aluminum unequal "L" bracket cut to length and screwed into the bottom flange of the Griffin to give the shroud a shelf to sit upon.
Part numbers to come. Silicone extrusions, threaded collars, beveled screws, washer nuts, and press fit studs were purchased from mcmaster carr. Rubber bushings are from Lowes.
Have some adjusting, shoring up, patching or replacing the gouged intercooler, and more rubber padding to add as well as a newly cut EPDM rubber shroud as from the factory. After a black powder coat and some factory coolant fill stickers it'll be almost invisible...
With my tig skills what they are the passenger side coolant tube pinch was patched/tigged by a local raceshop with some 304 tubing I provided and the 88 heater port cut and patched.


Next up is the improved fuel cam for the HPFP and titanium valve springs. Just received all the special tools (gotta love ebay) to hold the cam phasers in place as well as the tools to compress and remove the valve springs.
I started with a length of 4" aluminum channel, a hole saw for the radiator cap, cut "V's" in the skirts, annealed the aluminum and bent it into place.
Couldn't find any radiator cushions to mount the Griffin radiator so I purchased some hi-temp silicone extrusions and threaded collars to mount to the radiator saddle using beveled stainless screws to hold the radiator in place without touching the aluminum channel.
Used the O'le CAD skillset to festoon some brackets to the sides and flush riveted them on using 3/8" aluminum rods and a hammer/anvil.
Initial fit-up
Modifications to the bottom saddle were to bend the rear of the saddle to hold the larger Griffin (even moreso than Steven's as this is the 600hp version and 1" additional depth), trim the OEM lengthwise cushion ends. Reposition the bottom cushions to the outside holes exposed by cutting the lengthwise cushion and trim the ends of the end cushions to fit into the bottom of the Griffin. (Note the smaller well-nut for the new condenser as the OEM well nut impacts this 2.6" thick Griffin and gouged and pierced one of the fins, fuckity fuck fuck fuck...)
Cut, annealed, and pressed some additional brackets to hold the C7 ZR1 fan shroud in place with rubber bushings and press fit stainless studs.
I chose to reverse the flow of the coolant tubes, instead of crossing them over as the High Feature GM V6 has an opposite flow to that of the OEM radiator. Found a Gates 1.5" flex hose with 90 deg elbow and a 1.25" reducer for the coolant tube from the engine. For the exit side I pieced together two oddly shaped hoses I found searching through the excellent Dayco website, using 2 ICT Billet couplers, and a 1.75" to 1.25" reducer from HPS.
Not shown, but coming, is an aluminum unequal "L" bracket cut to length and screwed into the bottom flange of the Griffin to give the shroud a shelf to sit upon.
Part numbers to come. Silicone extrusions, threaded collars, beveled screws, washer nuts, and press fit studs were purchased from mcmaster carr. Rubber bushings are from Lowes.
Have some adjusting, shoring up, patching or replacing the gouged intercooler, and more rubber padding to add as well as a newly cut EPDM rubber shroud as from the factory. After a black powder coat and some factory coolant fill stickers it'll be almost invisible...
With my tig skills what they are the passenger side coolant tube pinch was patched/tigged by a local raceshop with some 304 tubing I provided and the 88 heater port cut and patched.
Next up is the improved fuel cam for the HPFP and titanium valve springs. Just received all the special tools (gotta love ebay) to hold the cam phasers in place as well as the tools to compress and remove the valve springs.
Last edited by draven on Sat Aug 20, 2022 10:28 pm, edited 5 times in total.
-
ericjon262
- Posts: 2824
- Joined: Mon May 24, 2010 5:34 pm
- Location: Aiken, SC
Re: High Feature V6 Swap
that looks great!
"I am not what you so glibly call to be a civilized man. I have broken with society for reasons which I alone am able to appreciate. I am therefore not subject to it's stupid laws, and I ask you to never allude to them in my presence again."
Re: High Feature V6 Swap
Starting the TapOutTuning Fuel Cam and springs/titanium retainer install.
Vaccuum pump

HPFP Cam

Close up

This LF3 had just over 35K miles when pulled however it already has some moderate carbon buildup in the intake valves. Not quite evident in these photos but the buildup is just under 10mm on some of the valve stems already... walnut blasting adapter already on order...


Cam bearing cap bolts are all TTY...
While learning and reviewing the timing procedure for this, as I'll have to re-time everything after replacing the fuel cam and springs, I'm contemplating if the "while you're in here" justifies replacing the tensioners, chains, and gear idlers. Only 35K miles vs peace of mind not knowing if previous owner replaced the oil as promptly as necessary and as often as needed for these engines.
Vaccuum pump
HPFP Cam
Close up
This LF3 had just over 35K miles when pulled however it already has some moderate carbon buildup in the intake valves. Not quite evident in these photos but the buildup is just under 10mm on some of the valve stems already... walnut blasting adapter already on order...
Cam bearing cap bolts are all TTY...
While learning and reviewing the timing procedure for this, as I'll have to re-time everything after replacing the fuel cam and springs, I'm contemplating if the "while you're in here" justifies replacing the tensioners, chains, and gear idlers. Only 35K miles vs peace of mind not knowing if previous owner replaced the oil as promptly as necessary and as often as needed for these engines.
-
The Dark Side of Will
- Peer Mediator
- Posts: 15626
- Joined: Wed Nov 24, 2004 11:13 pm
- Location: In the darkness, where fear and knowing are one
- Contact:
Re: High Feature V6 Swap
I mistook the vacuum pump for the HPFP at first glance... Had me thinking for a split second about how to adapt that to a Northstar
Great to see shiny parts and progress being made!
Great to see shiny parts and progress being made!
Re: High Feature V6 Swap
TapOutTuning modified OEM Fuel cam on top, OEM Fuel cam on bottom

TapOutTuning cam on right

TapOutTuning cam on right
Last edited by draven on Fri Sep 16, 2022 2:05 pm, edited 1 time in total.
-
The Dark Side of Will
- Peer Mediator
- Posts: 15626
- Joined: Wed Nov 24, 2004 11:13 pm
- Location: In the darkness, where fear and knowing are one
- Contact:
Re: High Feature V6 Swap
Sorry, MS onedrive mobile is misbehaving as the picture is not coming through on my end for some reason...
Yes, these are the the fuel cams..Oem on left and Tapout tuning modified OEM on right... You can see where the fuel lobe has a bit deeper valley with respect to the shaft shoulder.. Supposedly 30% more fuel... Yes, have to pull the whole cam. No biggie since I'm replacing springs and retainers.. But otherwise it would be a PITA.
The vacuum pump just keys into the rear of the right bank exhaust cam. Have to remove it to use the cam locking plates.. This vacuum pump is used solely for the vacuum actuated integrated wastegates
Cam locking plate installed on right bank after vacuum pump removed. Note the keyed end of the exhaust cam that drives the vacuum pump

Fuel Cam locked into place

The only cam that is necessary to "lock" into place as I'm disassembling is the fuel cam so that the phaser can be removed
Back of removed cam phaser for fuel cam showing oil pathways into phaser from cam, fed from head, fed from solenoid.

Fuel cam with phaser removed

On another note after removing and inspecting the 3 hydraulic timing chain tensioners and looking closely at the oil paths for the cam phasers to and from the solenoids and the lifters..... clean, high, topped off, and quality oil is absolutely a given... As most here already either knew or have read... Can't believe GM gave a 15k oil change interval for these engines initially.. The oil paths are very very tight and any blockage will cause a nasty chain (pun intended) of events every where.
The timing procedure for this family of engine is very reminiscent of the LQ1 timing oddly enough.. Where the lq1 required you to lock cams in place, unlock the right bank cam gears, and rotate the crank 360 deg, the high feature v6 engine has you install and time the primary lower and left bank chains, rotate crank 360 then set right bank timing chain. GM calls it stage 1 & 2 timing. Pics coming...
Grabbed all the cam locking plates and valve spring special tools off ebay. Just started replacing springs and retainers with special tool.
Yes, these are the the fuel cams..Oem on left and Tapout tuning modified OEM on right... You can see where the fuel lobe has a bit deeper valley with respect to the shaft shoulder.. Supposedly 30% more fuel... Yes, have to pull the whole cam. No biggie since I'm replacing springs and retainers.. But otherwise it would be a PITA.
The vacuum pump just keys into the rear of the right bank exhaust cam. Have to remove it to use the cam locking plates.. This vacuum pump is used solely for the vacuum actuated integrated wastegates
Cam locking plate installed on right bank after vacuum pump removed. Note the keyed end of the exhaust cam that drives the vacuum pump
Fuel Cam locked into place
The only cam that is necessary to "lock" into place as I'm disassembling is the fuel cam so that the phaser can be removed
Back of removed cam phaser for fuel cam showing oil pathways into phaser from cam, fed from head, fed from solenoid.
Fuel cam with phaser removed
On another note after removing and inspecting the 3 hydraulic timing chain tensioners and looking closely at the oil paths for the cam phasers to and from the solenoids and the lifters..... clean, high, topped off, and quality oil is absolutely a given... As most here already either knew or have read... Can't believe GM gave a 15k oil change interval for these engines initially.. The oil paths are very very tight and any blockage will cause a nasty chain (pun intended) of events every where.
The timing procedure for this family of engine is very reminiscent of the LQ1 timing oddly enough.. Where the lq1 required you to lock cams in place, unlock the right bank cam gears, and rotate the crank 360 deg, the high feature v6 engine has you install and time the primary lower and left bank chains, rotate crank 360 then set right bank timing chain. GM calls it stage 1 & 2 timing. Pics coming...
Grabbed all the cam locking plates and valve spring special tools off ebay. Just started replacing springs and retainers with special tool.
Last edited by draven on Fri Sep 16, 2022 2:42 pm, edited 1 time in total.
Re: High Feature V6 Swap
So called stage 1 TapOutTuning titanium retainers and springs to allow for running higher rpm under boost. My goals are only to bring the rpm redline up to 7200 under boost which is the stock LFX limit and to allow for the higher flow of the BW EFR turbine.

Valve Spring special tool for high feature series v6s along with leak down tester applying air pressure to cylinder to keep valve from falling into cylinder. Note the bolts for securing the tool to the head via the camshaft cap bearings, just above and below the spark plug tube, look a little short and could really be a few mm longer. They hold but fears of the LQ1 cam locking plates stripping the threads comes to mind.

One cylinder swapped out.

Valve Spring special tool for high feature series v6s along with leak down tester applying air pressure to cylinder to keep valve from falling into cylinder. Note the bolts for securing the tool to the head via the camshaft cap bearings, just above and below the spark plug tube, look a little short and could really be a few mm longer. They hold but fears of the LQ1 cam locking plates stripping the threads comes to mind.
One cylinder swapped out.
-
The Dark Side of Will
- Peer Mediator
- Posts: 15626
- Joined: Wed Nov 24, 2004 11:13 pm
- Location: In the darkness, where fear and knowing are one
- Contact:
Re: High Feature V6 Swap
Are they actually any lighter than stock, being that much larger?
Any reason (cost, I @$$ume) the new ones aren't tapered/beehived like the stock ones?
Any reason (cost, I @$$ume) the new ones aren't tapered/beehived like the stock ones?
Re: High Feature V6 Swap
They are listed as "beehive" on the website but they definitely aren't 'conical' anywhere....The Dark Side of Will wrote: ↑Fri Sep 16, 2022 3:47 pm Are they actually any lighter than stock, being that much larger?
Any reason (cost, I @$$ume) the new ones aren't tapered/beehived like the stock ones?
They are also not lighter... the larger retainers are titanium to maintain the same weight as the OEM. Still alot heavier, see below
OEM Spring: 33g
OEM Retainer: 5g
Tapout Spring: 45g
Tapout Retainer: 5g
A quick blurb from their website on the springs:
OEM specifications are 56 to 61 pounds of seat pressure closed and 134 to 149 pounds open.
Stage One springs are rated at 90 lbs. seat pressure at installed height and 230 lbs. @ 0.500” maximum lift.
Re: High Feature V6 Swap
Welp..... i get to pull the head... or at least one of them....
While trying to replace the intake springs and retainers on the #6 cylinder I had to tap the keeper/spring with a rubber mallet and socket to dislodge the keepers. I lost all pressure in the cylinder as a piece of the GDI carbon buildup came off and lodged between the valve and valve seat as the keepers cam off and the valve slipped into the cylinder. buggar....
Don't see this as an opportunity to go ARP head studs as I will not be pushing this thing to crazy crazy hp >600hp, my goals are trackable 500-550hp at most. The LF3/LF4 community consensus is that they are not needed until one goes above 650rwhp... Furthermore, the F40 transmission seems to have a limit of ~700hp in the saab community as my turbo manifold builder builds some internal strengthening girdles for them but you have to pop the case to install them. That is unless having ARPs are better for other areas other than just max hp... i.e. longer term durability at extended moderate to moderate high boost levels.
Regardless this will be an opportunity to pull the DI injectors and have them cleaned as well or even upgrade the HPFP.
-
The Dark Side of Will
- Peer Mediator
- Posts: 15626
- Joined: Wed Nov 24, 2004 11:13 pm
- Location: In the darkness, where fear and knowing are one
- Contact:
Re: High Feature V6 Swap
That happened to me YEARS ago when I was installing CHRF valvesprings on my Northstar.draven wrote: ↑Sat Sep 17, 2022 5:05 pm Welp..... i get to pull the head... or at least one of them....
While trying to replace the intake springs and retainers on the #6 cylinder I had to tap the keeper/spring with a rubber mallet and socket to dislodge the keepers. I lost all pressure in the cylinder as a piece of the GDI carbon buildup came off and lodged between the valve and valve seat as the keepers cam off and the valve slipped into the cylinder. buggar....
Don't see this as an opportunity to go ARP head studs as I will not be pushing this thing to crazy crazy hp >600hp, my goals are trackable 500-550hp at most. The LF3/LF4 community consensus is that they are not needed until one goes above 650rwhp... Furthermore, the F40 transmission seems to have a limit of ~700hp in the saab community as my turbo manifold builder builds some internal strengthening girdles for them but you have to pop the case to install them. That is unless having ARPs are better for other areas other than just max hp... i.e. longer term durability at extended moderate to moderate high boost levels.
Regardless this will be an opportunity to pull the DI injectors and have them cleaned as well or even upgrade the HPFP.
Digging back in the memory bank...
We turned the crank so the piston lifted the valve back up so the stem was close to the head.
We used a bent piece of wire through the plug hole to guide the stem into the exhaust port.
We used a claw tool to get the stem into the guide
We bent the wire into a hook to keep pulling up on the valve head
We continued to turn the crank, using the hook and the claw tool to guide the valve to prevent it from getting jammed
We were ultimately able to get the valve back into place without pulling the head
If you have the engine on a stand, you can be halfway there by turning the engine so the cylinder is slightly "below" level (top lower than bottom) with whichever side the valve is on being down. You can probably fish the valve out without pulling the head.
Unless you want an excuse to pull the heads...
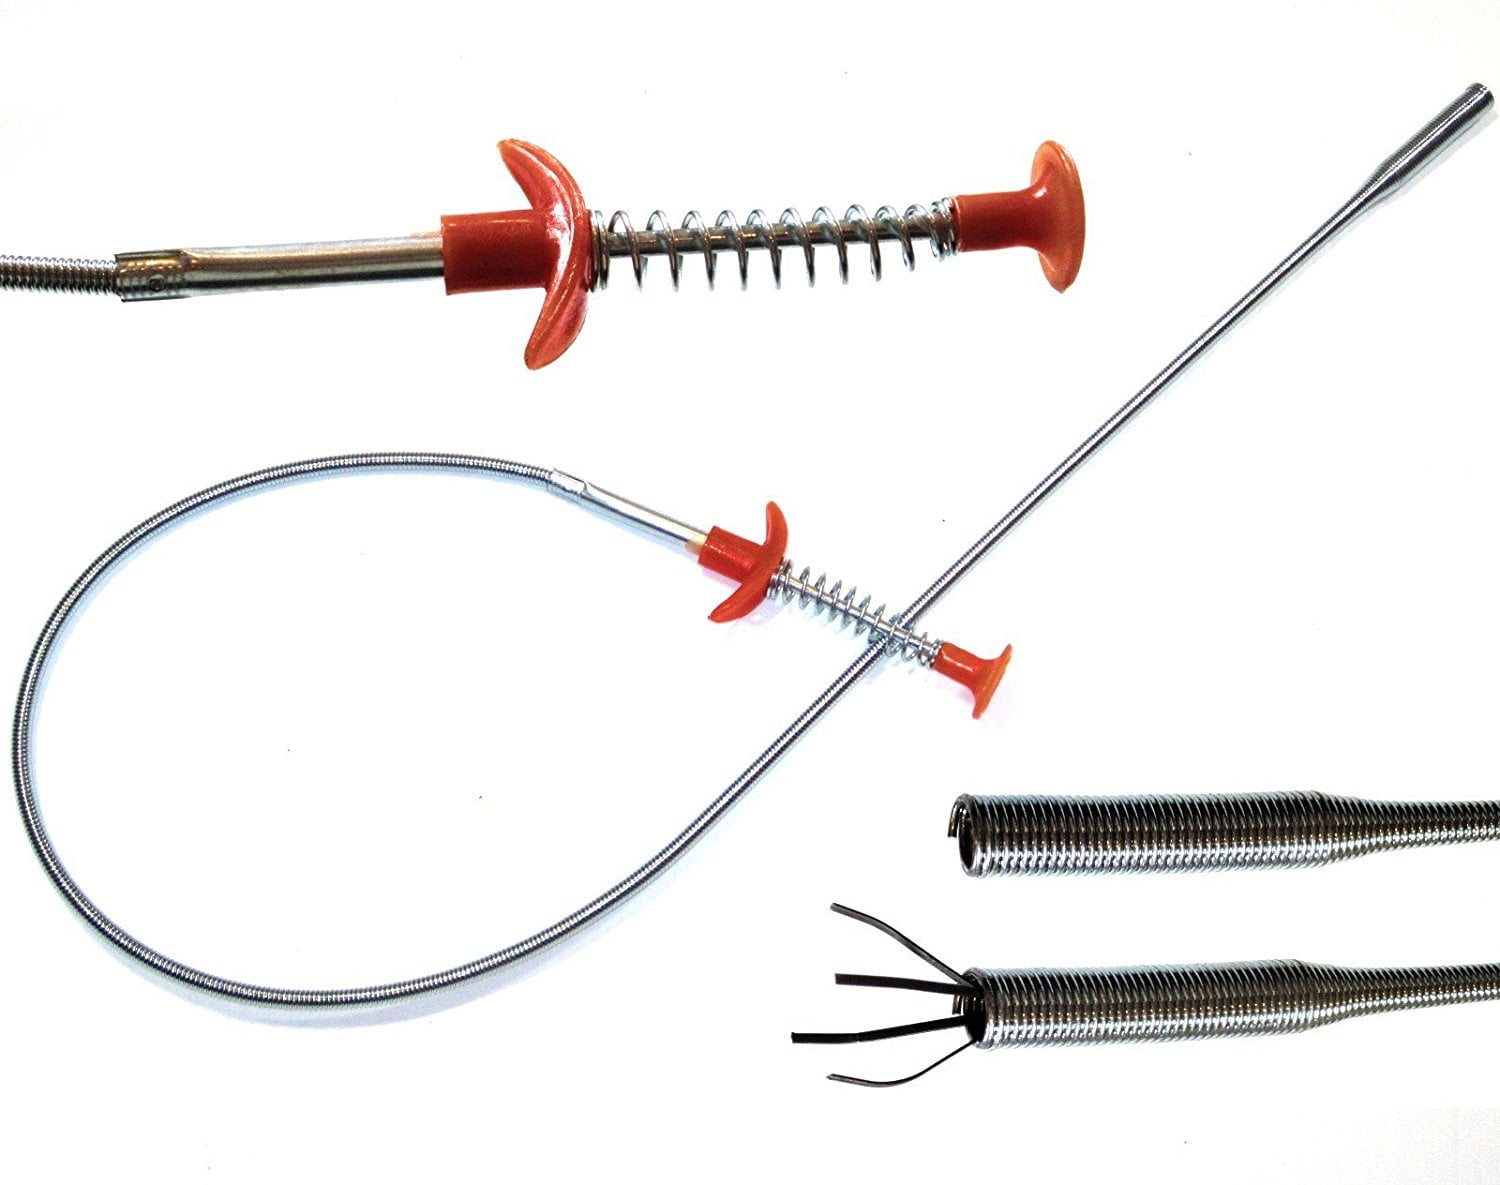
https://www.walmart.com/ip/4-Pack-Lot-3 ... /347734083
Re: High Feature V6 Swap
Pulled heads to refresh them... I did not want to dig into the engine as i want this thing running....in for a penny....
Direct injection intake valves with only 35k miles on them... The LF3 and LF4 have a rather elaborate PCV system due to positive crankcase pressure of the turbos....however will definitely be looking into a quality oil separator back into the pan long term. Maybe even a Perrin that routes coolant into it to help condense more oil out of the vapor.


Carbon fallen into cylinders from intake valves since purchase...


Intake bowls from heads

After soaking heads in Simple Green "Purple" for 36hrs then going after chambers with chemtec, ATF/Acetone mix, and non marking scotch brite pads

More chemtec, scotch brite, ATF/Acetone, and plastic razors on piston heads and top of block.....

After soaking and thoroughly cleaning a couple of the intake valves, the intake valve seat area on the valve have a fair amount of pitting already from slamming the flaked off carbon against the valve seat. Replacing all intake valves as they are relatively cheap from GM.
I start on ultrasonic cleaning and rebuilding the direct injectors next as they are already carboned up, especially the number 2 cylinder injector.... Once you pull one of these injectors you have to replace the retainer, two o-rings, a phenolic washer, cap, and two teflon seals which have to be stretched and then shrunk into their grooves. Luckily the cleaning of the injectors is so common with the carbon buildup that the kent moore tools for stretching and shrinking the teflon seals are readily available.
Direct injection intake valves with only 35k miles on them... The LF3 and LF4 have a rather elaborate PCV system due to positive crankcase pressure of the turbos....however will definitely be looking into a quality oil separator back into the pan long term. Maybe even a Perrin that routes coolant into it to help condense more oil out of the vapor.
Carbon fallen into cylinders from intake valves since purchase...
Intake bowls from heads
After soaking heads in Simple Green "Purple" for 36hrs then going after chambers with chemtec, ATF/Acetone mix, and non marking scotch brite pads
More chemtec, scotch brite, ATF/Acetone, and plastic razors on piston heads and top of block.....
After soaking and thoroughly cleaning a couple of the intake valves, the intake valve seat area on the valve have a fair amount of pitting already from slamming the flaked off carbon against the valve seat. Replacing all intake valves as they are relatively cheap from GM.
I start on ultrasonic cleaning and rebuilding the direct injectors next as they are already carboned up, especially the number 2 cylinder injector.... Once you pull one of these injectors you have to replace the retainer, two o-rings, a phenolic washer, cap, and two teflon seals which have to be stretched and then shrunk into their grooves. Luckily the cleaning of the injectors is so common with the carbon buildup that the kent moore tools for stretching and shrinking the teflon seals are readily available.
Re: High Feature V6 Swap
Ok RFT braintrust.... regarding exhaust manifold (headers) to block fasteners.. .will there be any real gain going with ARP, stainless, or even inconel (OE mazda rotary) studs instead of the OE 10.9 bolts?