Today, I continued blending the parts together to give it that seamless look. Here is a look at the front fender where it connects to the front bumper. I really want this car to be a seamless as possible.....

I am also working on the final fit of the rear tail light assembly and also the decklid. Every part of the rear end ( decklid, latches, tailights, both fender caps ) have to be adjusted to make everything line up correctly.

Alright, the driver side of the car and the rear is ready for primer. I decided to do a little minor change. Originally, I was going to use a Dodge Viper gas cap but it looked too large for the car. I also wanted to use the stock gas filler assembly but it was too plain and sticks out like a sore thumb. Since I really want smooth lines especially since the logos are being painted on the car, I want as few bumps on the car as possible. I decided to french in the gas cap so it is flush with the fender. The first thing I did was to grind away the beauty ring that rests on the fender. I then ground a taper on the assembly to make it like a wedge. It was then installed with bonding adhesive.

After that was dry, I them began to fill in any voids and shape the opening with fiberglass filler.

When that dry, I sanded and feathered the edges and this time, used a spray paint primer just to see how it looks. It will need to be filled in a little more since I don't want any gap showing and I also modified the hinge assembly so that the door could be brought outwards about 1/8" to keep it flush with the body. I think it will look very clean once all the fine tuning is done.

One last thing, since I am nearing paint, I decided to cut all of my templates for paint and give them a test fit for looks

The hood turned out good after the white went on. Here is a pic after wet sanding and no clearcoat.

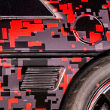
The layout of the vinyl stencils.

Here we go with the paint. The first thing that I did was redo the sizes of the masking. I didn't think they were proportionate with the original Huffaker. I started by measuring all the locations of the masking vinyl and marking the areas with a pencil. I wanted everything to be as straight and centered as possible. The first thing I did was set the masking for the Goodwrench logo and use several coats of paint with my airbrush.

After that dried, the masking was removed and then I set the masking for the Performance Parts logo and airbrushed it in red


Once that dried, I removed the masking and here is the result.

The next step was the GM logo. This was the biggest pain in the ass to line up and make even with the hood lines.

And of course the cool dude doing the work

After that came the number 55 at the top of the hood.

And the final product minus the clearcoat.

Alright....the planning continues. I am at a no-turning-back stage with these door skins. My plan is to use Dzus fasteners to hold the door panels in place, rivet the lock mechanism plate to the door frame, remove the lip that hooks on to the top of the door window strip, cut away part of the area where the door handle is installed so the door skin can be unhooked from it, fill in the stock mirror location, add aftermarket mirrors to the blank stationary plate at the front of the windows.
Here is the door sill with the marking points for the fasteners. I may or may not need the top center one. I also am keeping the 4 that are under the door.

Here is the rear of the skin with the area marked for removal

I spent a little over an hour modifying the door handle and molding. The reason that I am doing this is because of the removable door skin. I have to be able to take it off without disturbing the lock assembly.
This is what the stock door and molding looks like

Here is the modification to the door skin as well as the molding to allow the door handle to slide out from under the skin

The piece that was cut out was used behind the door handle. That way, I am assured a nice fit that is level with the door skin.

And finally, I riveted the lock assembly in place since it normally is attached to the door skin.

For those wondering....I know the handle looks like crap, the molding is knicked in spots but for those of you who know my work, you know that everything will look brand new when I'm done.
I temporarily installed the molding and put down some masking tape. The molding will be red, the line where the masking tape sits will be silver and the rest will follow the race car scheme.

Ok.....first off, I just wanted to shed some light on a cheap but incredibly useful item. Many auto stores have bar stools for 10-20 bucks. If you get one and either add a couple of 2x4's or a board, you will have a great turntable to spin the item as you are painting it. There is nothing worst than having to walk around the item you are painting risking dust or fuzz from your clothes becoming part of the paint job. I rather stand in one spot and turn my work.
With that said, I gave the molding a 4th coat of clear

I then masked off the door at the line where the silver will start and sprayed the black basecoat

After that had set for a while, I masked the black and shot the white on the top of the door

I ran a little test fit of the molding just to make sure I liked the color of red I used. The part looks dull because I use an intercoat clear at certain points......a necessity for airbrushing so you don't "wipe off" your airbrush work. Even though the main colors are not airbrushed, I just use intercoat out of habit.

The paint has to dry completely before I can mask the black and spray the silver stripe as well as the silver "55" and the white "Huffaker" logo. Here is the silver that I am using. It really should look great next to the black.

So today, I wetsanded the door and layed the silver stripe under the molding and the "Huffaker" logo in white


The toughest decision was on the "55". The racecar has the numbers cut so they follow the molding line and are staggered at the bottom. For me, I really would rather have the numbers level with the bottom of the door so I layed the vinyl at that point.

Ready for the silver


The camera flash actually made the silver look white but trust me, it is a bright silver. Next step is wetsanding and clearcoat.