progress on the banshee...

Fiero topics such as vendor reviews experiences, car shows, Fiero buys acquisitions, Fiero Photography.

Moderator: Series8217

pmbrunelle
Posts: 610
Joined: Thu May 20, 2010 10:07 pm
Location: Grand-Mère, QC

Re: progress on the banshee...

Post by pmbrunelle »

The Dark Side of Will wrote: Wed Sep 22, 2021 9:17 pm Maybe Home Depot Racing carries a 10x1.0 bottoming tap?
Or just cut off the tapered end from a normal tap.

I do that to give a second life to worn taper taps, since the wear occurs on the tapered teeth anyway.
ericjon262
Posts: 2853
Joined: Mon May 24, 2010 5:34 pm
Location: Aiken, SC

Re: progress on the banshee...

Post by ericjon262 »

a bottoming tap was on the list of ideas as well, I'm pretty sure the ground bolts will work flawlessly though.
"I am not what you so glibly call to be a civilized man. I have broken with society for reasons which I alone am able to appreciate. I am therefore not subject to it's stupid laws, and I ask you to never allude to them in my presence again."
ericjon262
Posts: 2853
Joined: Mon May 24, 2010 5:34 pm
Location: Aiken, SC

Re: progress on the banshee...

Post by ericjon262 »

I had decided a while back to install timeserts in all of the rocker bolt holes, 2 had already pulled the threads, I really didn't want to make that repair on the assembled engine again, it was quite tricky to do and maintain any illusion of cleanliness. last time, I installed helicoils, but I really prefer timeserts, the two helicoiled bolts will remain helicoiled, and all the remaining bolts have now been drilled, counter bored, and counter counter bored, and tapped in preparation of installing the timeserts.

The timesert kit uses a special counter bore to limit the depth the insert can be threaded to, unfortunately for me, the 3x00 rockers align using a slot, and the threads are in the bottom of said slot, and the counter bore tool does not fit in said slot... to fix this, I bought a 1/2" counter bore, the machinist at work made a pilot to fit the counter bore, and I made a depth stop so that I could quickly bore all 10 positions to the same depth.

Image

Flawless victory! I plan to clean the heads very thoroughly, and install the inserts sometime in the next day or two depending on work hours and the weather.

Image

I also made a ghetto AF thread chase to clean out all of the head bolt holes, a couple quick passes on the mill and now all the threads in the block are nice and clean.

Image
"I am not what you so glibly call to be a civilized man. I have broken with society for reasons which I alone am able to appreciate. I am therefore not subject to it's stupid laws, and I ask you to never allude to them in my presence again."
ericjon262
Posts: 2853
Joined: Mon May 24, 2010 5:34 pm
Location: Aiken, SC

Re: progress on the banshee...

Post by ericjon262 »

not a lot to report, been working alot, trying to pick up shifts and get overtime, along with lots of training on PLC operation and writing ladder logic for Allen Bradley controllers, it's pretty cool stuff.

I made a plate to start my new front transmission mount, and am still trying to decide how to execute the rest of the plan.

Image

as I was doing this, I noticed just about any way I made the new mount would interfere with the clutch line... ERG. My clutch line is in pretty poor shape either way, so I decided it would be a better idea to make a new line that goes around the mount.

I ordered a clutch line adapter that adapts the F23 line to a -4AN, this is all fine and good, except the hardline on the car isn't -anything, it's metric...

Image

I couldn't find a suitable -4 to 6mm adapter but I do have a 37 degree flare tool, and 6mm is just a hair under 1/4",(-4 AN) while I was at work today, I took a -4 tube ferrule, and took dimensions off of it, and turned a new ferrule on the lathe that would fit the 6mm tube, and the -4 tube nut. now all I need to do is flare the 6mm tube with my ferrule and a -4 nut, and it should work flawlessly.

hard to tell in the picture, but -4 aluminum "Earls" ferrule is left, center is a -4 stainless ferrule, and right is the one I made at work.

Image

I'm pretty happy with how it turned out, considering I made a 3/8" diameter part on a 12" lathe meant for (relatively) massive parts. note the spray can on the cross slide.


Image
"I am not what you so glibly call to be a civilized man. I have broken with society for reasons which I alone am able to appreciate. I am therefore not subject to it's stupid laws, and I ask you to never allude to them in my presence again."
pmbrunelle
Posts: 610
Joined: Thu May 20, 2010 10:07 pm
Location: Grand-Mère, QC

Re: progress on the banshee...

Post by pmbrunelle »

I like big lathes; they don't vibrate. It's like engine displacement; bigger is better! I never used one that big though.

The only downsides are that you might not get the same RPM as on a smaller lathe, and the larger-sized chuck might not be able to grip such small rods.

Your workplace looks like it's a clean factory.
ericjon262
Posts: 2853
Joined: Mon May 24, 2010 5:34 pm
Location: Aiken, SC

Re: progress on the banshee...

Post by ericjon262 »

pmbrunelle wrote: Wed Oct 06, 2021 12:10 pm I like big lathes; they don't vibrate. It's like engine displacement; bigger is better! I never used one that big though.

The only downsides are that you might not get the same RPM as on a smaller lathe, and the larger-sized chuck might not be able to grip such small rods.

Your workplace looks like it's a clean factory.

When I first toured the plant, I was blown away by how clean it was, there's really only one part of the plant that is particularly dirty, and that's Mixing, where, as the name implies, the rubber is mixed for the tires.

you're right about the vibration, the main issue with the size, is that the tooling is also big, which makes it a little harder to see around, and it can be a bit cumbersome. for smaller parts, we sometimes chuck a smaller chuck in the larger chuck... it's ghetto, but it works. we have a smaller lathe, but somehow the motor got burnt up or something. it's taking way longer to get fixed than I would have expected.
"I am not what you so glibly call to be a civilized man. I have broken with society for reasons which I alone am able to appreciate. I am therefore not subject to it's stupid laws, and I ask you to never allude to them in my presence again."
ericjon262
Posts: 2853
Joined: Mon May 24, 2010 5:34 pm
Location: Aiken, SC

Re: progress on the banshee...

Post by ericjon262 »

a while back, I bought a V band flange from the same manufacturer that I bought the V bands on the turbo manifolds from, with the intention of using them to blue check and lap the flanges on the manifolds, but when they arrived, they were very different than the flanges on the manifold.

I made this on the lathe at work from stuff in the scrap bin, unfortunately, it wasn't quite right.

Image

while shopping for stuff for the Gran Damn, I looked in my amazon search history for some of the F23 parts I had ordered for the Fiero, and realized I hadn't bought the V bands from the manufacturer that I thought, so I ordered a set of flanges from the correct manufacturer, they should be here next week.

I also ordered some shims for the rocker bases, ideally, they should improve the sweep across the valve tip, which should reduce guide wear, and help high RPM performance, I'm hoping they arrive tomorrow and I can get the top end put all the way back together.

I still need to work on the new transmission mount, fortunately/unfortunately, I worked 90 hours last week, and am on track to work 85-90 this week, it's really hard to turn down the extra shifts, they make for epic paychecks, and I want to build a new shop so, I forgo a little sleep and time off. One day I'll start my full time job as a well paid rich person.
"I am not what you so glibly call to be a civilized man. I have broken with society for reasons which I alone am able to appreciate. I am therefore not subject to it's stupid laws, and I ask you to never allude to them in my presence again."
ericjon262
Posts: 2853
Joined: Mon May 24, 2010 5:34 pm
Location: Aiken, SC

Re: progress on the banshee...

Post by ericjon262 »

the new Vband showed up, and surprise surprise, order the right part and it fits... DOH. %) The rocker shims got here too, I put one on a modified pedestal, and at first I thought I messed up, I gave it a little push, and it snapped into place nice and tight!

Unfortunately, I've been super busy at work, I have picked up every available shift since the 4th except for yesterday, which I used to swap my schedule from nights to days. it's funny how if you told me I would volunteer to work 90+ hours a week multiple weeks in a row when I was in the navy, I would laugh, but here I am... I guess overtime pay is quite the motivator. :crazy:
"I am not what you so glibly call to be a civilized man. I have broken with society for reasons which I alone am able to appreciate. I am therefore not subject to it's stupid laws, and I ask you to never allude to them in my presence again."
pmbrunelle
Posts: 610
Joined: Thu May 20, 2010 10:07 pm
Location: Grand-Mère, QC

Re: progress on the banshee...

Post by pmbrunelle »

V-bands seem to be the kind of thing that could be standardized and made interchangeable, but they're not...
ericjon262
Posts: 2853
Joined: Mon May 24, 2010 5:34 pm
Location: Aiken, SC

Re: progress on the banshee...

Post by ericjon262 »

pmbrunelle wrote: Fri Oct 22, 2021 12:22 pm V-bands seem to be the kind of thing that could be standardized and made interchangeable, but they're not...
That would definitely make things easier, that being said, the V band I thought I had ordered was also a different size, 2-1/4 VS 2-3/8
_________________________________________

I've worked almost every day this month, the overtime makes for awesome paychecks, but not much time for anything else, over the past 2 days I whittled a bolt on bolthole out of 6061 on the mill at work, I'm still learning my way around the mill, I know enough to be dangerous, but not enough to make nice looking part, so I sandblasted it to hide the toolmarks.

Image

Image

Image

This part replaces a spacer installed between the AC compressor, and the block, and will allow me to make a much better tensioner mount. Next, I'll make a plate that bolts on in the red circled holes. I wanted to use the threaded idler boss on the timing cover (blue circle) but unfortunately, it just won't work out, so I'll mount the tensioner somewhere in the yellow circled area. The idler boss will be ground off.

Image

here's a shot of the tensioner on the idler boss, it gives an idea of the placement, and how the belt routing should work. it's unfortunate I can't put it right there, the problem is an issue with the anti rotation pin than anything else, installed here, the pin would need to occupy the same space one of the timing cover bolts. The tensioner itself came from the XFI cobalt I got the FY1 trans for the Gran Damn from.

Image

overall, this new tensioner setup will be stronger, a overall simpler design, and should allow me to eliminate an idler near the alternator. I'm hoping it's also lighter, parts that were steel are now aluminum, but they're also bigger, and the tensioner itself is more massive. The two timing cover bolts, and the new bolt will be flatheads, countersunk so they maintain adequate clearance to moving parts. I'm hoping to finish it up tomorrow.
"I am not what you so glibly call to be a civilized man. I have broken with society for reasons which I alone am able to appreciate. I am therefore not subject to it's stupid laws, and I ask you to never allude to them in my presence again."
ericjon262
Posts: 2853
Joined: Mon May 24, 2010 5:34 pm
Location: Aiken, SC

Re: progress on the banshee...

Post by ericjon262 »

The new bracket is more or less complete, sometime this weekend, I'm going to map the entire mount in CAD. I haven't weighed both assemblies yet, but the new assembly feels lighter than the old one, that being said, I do need to find or make a tensioner pulley that is slightly wider, or offset more.

The old, ugly, heavy, poorly functioning, assembly made of scraps:

Image

Image

The new, stronger, lighter, hopefully better functioning part made of scraps:

Image

Image

Image

I know i can still take more weight out, unfortunately, we didn't have any scrap aluminum plate to make the flat part out of, and it wouldn't be impossible to make the mount use just the two boltholes on the side of the block instead of catching the timing cover bolts as well. I'll explore this idea more later, for now, I'll find the proper pulley and call it good.

I'll try and get an installed picture this weekend.
"I am not what you so glibly call to be a civilized man. I have broken with society for reasons which I alone am able to appreciate. I am therefore not subject to it's stupid laws, and I ask you to never allude to them in my presence again."
ericjon262
Posts: 2853
Joined: Mon May 24, 2010 5:34 pm
Location: Aiken, SC

Re: progress on the banshee...

Post by ericjon262 »

New design, which should allow for the stock ecotec tensioner, without a pulley swap, which I consider the most ideal scenario. I found a hefty chunk of 6061 in a scrap bin that I'll carve it out of, and I'll install a steel insert for the bolt hole instead of just tapping the aluminum. hopefully I'll have a few spare hours on night shift next week to knock it out, worst case, I install what I have and find the proper pulley to make it work.

Image
"I am not what you so glibly call to be a civilized man. I have broken with society for reasons which I alone am able to appreciate. I am therefore not subject to it's stupid laws, and I ask you to never allude to them in my presence again."
pmbrunelle
Posts: 610
Joined: Thu May 20, 2010 10:07 pm
Location: Grand-Mère, QC

Re: progress on the banshee...

Post by pmbrunelle »

A lot of chips to carve that out of a single block.

Looks like the ideal part for a first-time backyard casting operation :wink:
ericjon262
Posts: 2853
Joined: Mon May 24, 2010 5:34 pm
Location: Aiken, SC

Re: progress on the banshee...

Post by ericjon262 »

pmbrunelle wrote: Sat Nov 06, 2021 11:02 am A lot of chips to carve that out of a single block.

Looks like the ideal part for a first-time backyard casting operation :wink:
it would, it's unfortunate that my casting furnace and crucible were more or less destroyed on the trip to SC from Washington... I plan to rebuild it, bigger and better, but I have a ton of other things in line ahead of it when I have a free chunk of metal to work with.
"I am not what you so glibly call to be a civilized man. I have broken with society for reasons which I alone am able to appreciate. I am therefore not subject to it's stupid laws, and I ask you to never allude to them in my presence again."
Honest Don
Posts: 469
Joined: Wed Aug 08, 2007 11:08 am

Re: progress on the banshee...

Post by Honest Don »

Lotsa chips, but it'll be good practice. Depending on what it is, I like the aesthetic of leaving tool marks on stuff I make for myself; i.e. "I didn't just buy this shit."
ericjon262
Posts: 2853
Joined: Mon May 24, 2010 5:34 pm
Location: Aiken, SC

Re: progress on the banshee...

Post by ericjon262 »

Honest Don wrote: Wed Nov 10, 2021 11:17 am Lotsa chips, but it'll be good practice. Depending on what it is, I like the aesthetic of leaving tool marks on stuff I make for myself; i.e. "I didn't just buy this shit."
I don't mind the tool marks, but I also try and minimize them, I also like the other side of that conversation

"where did you get that?"

"I made it"

"you what????"

There's a good chance that if this one works, I'll draw them up for the plasma cutter so I can produce them and alternator brackets w/ dogbone mounts. it would make a 3400/3500 a bolt in swap.
"I am not what you so glibly call to be a civilized man. I have broken with society for reasons which I alone am able to appreciate. I am therefore not subject to it's stupid laws, and I ask you to never allude to them in my presence again."
ericjon262
Posts: 2853
Joined: Mon May 24, 2010 5:34 pm
Location: Aiken, SC

Re: progress on the banshee...

Post by ericjon262 »

the new belt tensioner is complete, but I may still make another mount, please excuse the picture quality, or lack there of. I planned to make the bracket from one piece, but the piece I had wasn't big enough, so the new bracket is also 2 pieces.

Image

this is my number one concern

Image

The belt is super close to the tensioner body, about 2mm from it, I'm concerned that if I run it as is, the belt will hit.

This feature on the other hand, is clutch! there's enough room to pass the belt between the tensioner and timing cover, theoretically, one could change the belt with 0 tools.

Image

I could solve the problem of the belt clearance by making a new, longer mounting face, this would also bring the lever of the tensioner closer to perpendicular to the belt, which should improve belt tension.

Image

I think for now, I'll run it as is, and if I have problems, I will make the new plate.

TL:DR

new belt tensioner is better, but could be improved further.
"I am not what you so glibly call to be a civilized man. I have broken with society for reasons which I alone am able to appreciate. I am therefore not subject to it's stupid laws, and I ask you to never allude to them in my presence again."
ericjon262
Posts: 2853
Joined: Mon May 24, 2010 5:34 pm
Location: Aiken, SC

Re: progress on the banshee...

Post by ericjon262 »

I did some sketchy shit, and was able to get decent electrical power into the shop, via the outlet for the dryer in the house, and a massive diameter extension cord

With my new found power, I got to work on the new transmission mount, I was making fast progress, and was really pumped.

"New phone who's this?"

Image

this was the point at which I found out my welder no longer works... I have no idea what happened... I tried powering it up on both 240V, and 120V, and it wouldn't even click. I after checking breakers, and fuses and finding nothing wrong, I called miller, after waiting on hold for 30 minutes, I was told that based on the symptoms I provided, "it sounds like the control board is fried" Ok, how much is a new board "MSRP is $1600" Keep in mind I paid $1800 for the welder when I bought it new. I'll keep my eye out for a new control board, but I don't see myself buying another miller welder now.

in the meantime, I decided to pick up a Primeweld TIG225X. They have a ton of good reviews, with all of the features of my Miller, plus many more, for half the price of a control board. unfortunately, it's still a week out.

Once I have access to a welder again, either in a week, or at work, I'll tack everything in the above picture together and begin working on bridging the gap between there, and the mount boss on top of the transmission.
"I am not what you so glibly call to be a civilized man. I have broken with society for reasons which I alone am able to appreciate. I am therefore not subject to it's stupid laws, and I ask you to never allude to them in my presence again."
pmbrunelle
Posts: 610
Joined: Thu May 20, 2010 10:07 pm
Location: Grand-Mère, QC

Re: progress on the banshee...

Post by pmbrunelle »

Considering that a transmission mount doesn't turn very much, does it really need to be greased to avoid the squeak-squeak sound?
The Dark Side of Will
Peer Mediator
Posts: 15629
Joined: Wed Nov 24, 2004 11:13 pm
Location: In the darkness, where fear and knowing are one
Contact:

Re: progress on the banshee...

Post by The Dark Side of Will »

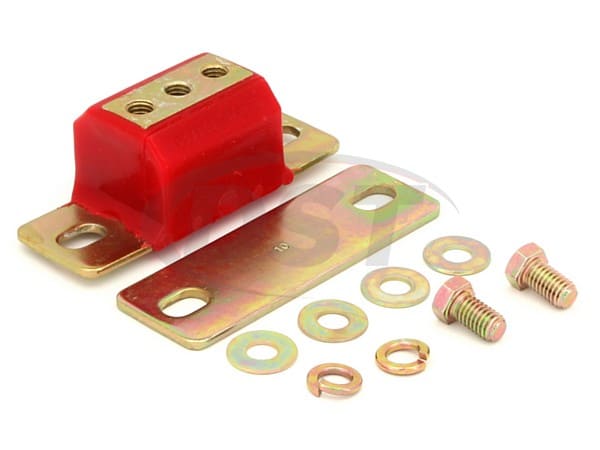
For that matter, why not one of these guys that doesn't need to be welded to the cradle?

https://www.energysuspensionparts.com/3.1108

Image
Post Reply